CLI apps in Objective-C: tips and tricks
- Published
- 2 September 2014
- Tagged
It's been a while since I wrote on making command-line apps in Objective-C. It's interesting to me that I don't see more on the subject: it's not like command-line applications are hard to make, or that Apple actively discourages them. However, the lack of documentation means it was a bit tricky for me to get started.
As linked above, I've previously written some notes on how to make Objective-C applications. After the success of kanban-fetch and the sudden motivation to clean it up, I've discovered some handy shortcuts and best practices I'll be sticking to in the future.
Setup
After extensive work in both XCode and SublimeText, I much prefer working in XCode, whatever the scale of the application. Even a two-file application is easier in XCode, thanks to command completion and syntax highlighting. Even if the build process isn't running through XCode, it simply saves so much typing.
The only exception to this is when developing CocoaPods, which I've been doing in my text editor[1] CocoaPods don't require an .xcproject or anything else of the regular framework of an Objective-C program, which makes this viable.
Working with the command line
If you're developing a command-line app which goes anything beyond the basics, you'll probably want to cast your eyes over the BRLOptionParser CocoaPod. It's basically a wrapper for getopt_long, and it's amazing. Adding flags and options to your command-line app suddenly got a lot easier.
Since extracting the task- and project-exporting code from my command-line apps into its own CocoaPod, I've been working on developing these projects in parallel. Since I'm a terrible person, I'm not doing a very good job of unit testing my CocoaPod[2] But if you know of a good guide to unit testing CocoaPods, I'm all ears
The whole development cycle sped up immensely when I discovered I could link my application directly against the CocoaPod, even as it was in development. This voodoo was achieved in the application's I've been sticking to ruby 1.8.7 hash syntax in podfiles–you never know what version of ruby someone else might have installed. podfile, by virtue of the :file hash[3]
pod "JROFBridge", :file => "/path/to/folder"
You don't even need to run pod update in the directory to get the benefits of your latest changes: instead, CocoaPods loads the files in straight from source. This has a second benefit: you can edit the podfiles directly from the project you're using them in. If you find you've borked a method call within the CocoaPod and it's causing your build to fail, you can dive into the guts of the pod and fix it without even changing windows.
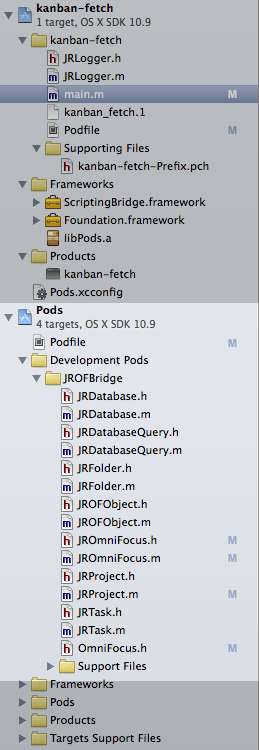
Edit your CocoaPod directly in XCode.
Needless to say, you should replace this reference in your podfile with a production-ready equivalent before you push it to the public. I host JROFBridge on github, and my production Podfile links to the repo:
pod "JROFBridge", :git => "https://github.com/jyruzicka/JROFBridge.git"
Build and test
I've been testing my command-line apps by two methods:
- In app build-and-run
- Makefile tests
In-app build-and-run allows you the luxury of testing within XCode, while makefiles trade ease of testing for flexibility.
Build-and-run
XCode Build-and-run is perfect if you only need to test one set of flags or conditions. You can even run various different tests using it, although there are better ways to automate this sort of thing.
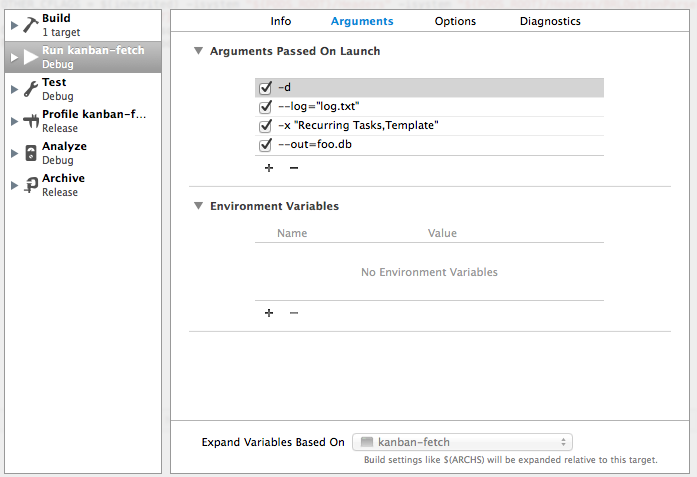
To edit which flags XCode uses when running your app, edit your project's scheme by clicking its name in the toolbar and selecting "Edit Scheme...":

Editing an application scheme
By clicking "Run kaban-fetch, I use the following arguments:
kanban-fetch -d --log="log.txt" -x "Recurring Tasks,Template" --out=foo.db
So my "Arguments Passed On Launch" section looks like this:
With makefile tests
You can build XCode projects from the command line using the xcodebuild command. Given this, it's pretty easy to build a makefile to build+run your project. You can even do multiple tests, with multiple arguments. A sample make command might look like this:
test:
  xcodebuild -workspace kanban-fetch.xcworkspace -scheme kanban-fetch -derivedDataPath ./testfiles
  ./testfiles/Build/Products/Debug/kanban-fetch -d --log="log.txt" -o foo.db
I haven't had the need to extensively use this in any of my own projects yet, but it should be powerful enough to cover any cases where XCode's "Build + Run" isn't flexible enough for your needs.
After the build
XCode tends to store its products in rather cryptic locations inside ~/Library. If you're doing post-build work (e.g. packaging and deploying) you probably don't want to go hunting through your Library every time you build. Thankfully, you can add your own script actions for XCode to run after building.
If you access the "Edit Schemes..." menu again, and this time click on the disclosure arrow next to the "Build" phase, you'll be presented with a list which includes the item "Post-actions". This allows you to run scripts and send emails every time your build succeeds. My script copies the binary from the built products directory (wherever it may be) into my outbox, then displays a growl notification:
cp ${BUILT_PRODUCTS_DIR}/kanban-fetch ~/Desktop/Out
echo "kanban-fetch copied to ~/Desktop/Out" | ~/.rbenv/shims/growl -H localhost
You could even add testing scripts here if you really wanted to, or relocate your binary for further testing (if you prefer building in XCode).
That's all I have right now. Since I'll be looking at more command-line applications in the future[4] Maybe even working on the one-click installer for kanban-fetch that I keep promising...